Scripting Introduction
This introduction will run you through how to create your first Actor class in script, and how to interact with it in unreal and blueprint.
Setup
Make sure you have the following set up:
- Install or compile the custom engine build for UnrealEngine-Angelscript.
- Install Visual Studio Code.
- Install the Unreal Angelscript Extension for visual studio code.
See the Installation page for details.
Starting the Project
- Start the custom unreal editor and open your project.
Opening your project will automatically create an emptyScript/folder inside your project folder. - Start Visual Studio Code, and from the menu
File -> Open Folder, open your newMyProject/Script/folder.
Tip: You can also click the "Open Angelscript workspace" option from the Tools menu to automatically open the scripts folder in Visual Studio Code.

Creating the Actor Class
Within Visual Studio Code, create a new file and call it IntroductionActor.as.
Files with the .as extension placed under your project's Script/ folder are automatically loaded by the angelscript plugin.
Inside IntroductionActor.as, let's declare a new Actor class:
We've now created our first scripted Actor!
Placing the Actor in Unreal
Immediately after hitting "Save" on our script file, it should become available within the unreal editor.
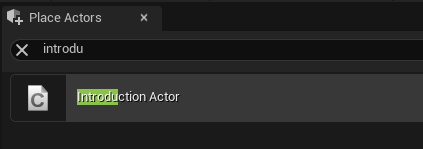
- Open the
Place Actorspanel (this can be found in Unreal'sWindowmenu if you don't have it open already). - Search for "Introduction Actor". Your new scripted actor should appear in the list.
- Place the "Introduction Actor" into your level.
Adding Functionality to the Actor
We have a totally empty actor in the level now with no functionality. As an example, let's make this actor perform a configurable countdown:
Some of the important things that are happening here:
- The
CountdownDurationvariable has been declared as aUPROPERTY(), this makes it configurable from the Unreal editor. You can select the actor in the level and change the countdown duration to be higher or lower than the default 5 seconds.
See the documentation on Properties and Accessors

- We override the
BeginPlayandTickevents to implement functionality on the actor.
See the documentation on Functions and BlueprintEvents - When BeginPlay happens, we start our countdown.
- When Tick happens, we count down the countdown and check if it's complete.
- After the countdown is done, we use
Print()to show a message on screen.
Now, if you play the level the actor is placed in and wait 5 seconds, you will see the message appear:

Adding Components to the Actor
Right now, our Actor is still empty of any components, and only implements some functionality on tick.
Let's add some components to it! We want a Scene Component as the root, and then attach a Static Mesh Component and a Billboard Component to it.
Add the following at the top of your actor code:
When you save your script file, you should see the new components appear on the Introduction Actor you've placed in the level.
You can read more about adding components on the Actors and Components page.

Tip: Clicking one of the "Edit in C++" links in the components menu will jump your Visual Studio Code to the place the component is added in your script.
The angelscript plugin often hooks into Unreal's normal C++ functionality, so script classes behave like C++ classes in many ways.
Creating a Blueprint Actor
The actor now has a Static Mesh Component, but we can't see it because no Static Mesh has been chosen on it!
We could of course select the actor in the level and choose one, but we don't want to do that for each actor we place individually.
Instead, let's create a Blueprint of our new introduction actor:
- Open the Content Browser, and click
Add -> Blueprint Class, to use the normal way to create a new blueprint. - When asked to pick a Parent Class, search for our "Introduction Actor" and select it:

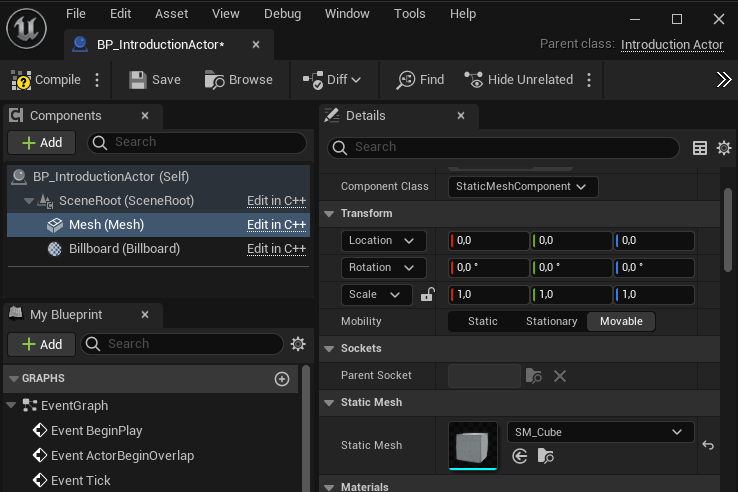
- Let's call our new blueprint
BP_IntroductionActor, so it's clear that we're dealing with an actor blueprint. - Now we can open our new blueprint and choose a mesh for its Static Mesh Component.
Here I am choosing the engine's standardSM_Cubemesh, but feel free to choose one of your own.
- Make sure to remove the existing
IntroductionActorfrom your level, and place a newBP_IntroductionActorin the level so we can see it!
Calling in and out of Blueprint
Now that we have a blueprint, we can change the script to work together with its node graph:
- We will change the actor so the countdown is no longer started right away, but requires a function call to start it.
- We also add an overridable blueprint event so our actor blueprint can be notified when the countdown is finished.
In our IntroductionActor.as, change the script code for its BeginPlay and Tick functions to this:
After saving this change, we can now open BP_IntroductionActor, and add nodes like this:
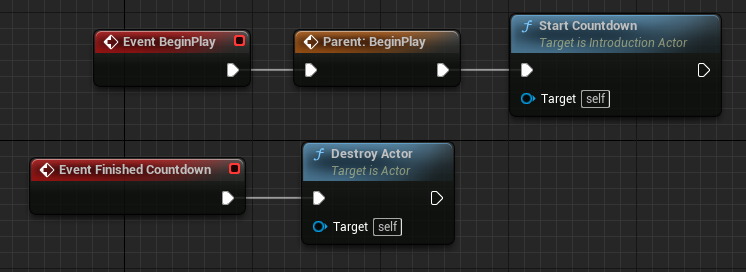
Now, the blueprint must specifically start the countdown, and when the countdown is finished the blueprint will automatically destroy the actor.
If you play the level with the blueprint placed, you will see it disappear after 5 seconds.
Script Examples
The UnrealEngine-Angelscript project contains a Script-Examples/ folder.
Here, you can find more detailed example scripts that you can read or copy to your project.
-
One good place to start is the Example_MovingObject.as actor example.
-
You can also look through the Examples Folder on Github.
Further Reading
More documentation is available on this website in the sidebar to the left.
We recommend reading through at least the "Script Features" pages to get an overview of what can be done in scripts.
Some good starting points are: